Wednesday, April 29, 2015

We've MOVED! Check out our new blog space and our Wool Sale


Hello! 
Pardon us for being absent on this blog!
We have moved it, please visit our new blog space here: http://nordicmart.com/blog/


We're also having a HUGE wool sale right now! Seriously crazy low prices! So head to our webstore to take advantage of that :)


Thursday, April 10, 2014

Inspiration Pinboard: Cinematic Symmetry


Movies draw their inspiration from everything in the world around them, and so can your knitting or crochet crafts.

While watching movies lately, some symmetrical pattern inspiration leaped off the screen. We created a pin board to highlight our inspiration connections.

Pinboards or journals are great ways to store your inspiration as you come across it. Whenever you need ideas for color combos, patterns, or any new ideas, flipping through these inspiration piles can help stir your imagination.

This edition draws mostly from the Shining, and the works of Stanley Kubrick, who loved symmetry and patterns and featured them prominently. The eye-catching scenes in his movies inspired us to choose yarn colors, pattern textures, and some little accessories and additions to projects.

Colors, patterns, and textures. Collect your own photos and make inspiration collages featuring whatever captures your imagination. This is how we were inspired, but your own unique eye and style is what makes an inspiration board great!

The colors coming across in our board reminded us of these adorable Baggu reusable bags. The orange and yellow cat print is bold, but we love it. Find this bag and other great prints here »

Danny wears a knitted sweater in the film, featuring stars and the Apollo 11 spaceship. We located the pattern for this sweater, and think Karisma has the perfect colors for the project. 

These cotton ribbons also pull the colors from the carpeting or from the knit sweater photos we have added to our board. Featuring Nordic patterns, they are great additions to your projects and they will add another detail that emphasizes color and pattern. Find all our Cotton Ribbons here »

The iconic carpet of the Overlook Hotel features such a striking pattern, and bold colors.
We think Drops Alpaca could replicate this pattern perfectly.
We feel inspired to knit a scarf or socks in this pattern! Colorwork,  oh yeah!

The symmetrical black and white patterns featured in Kubrick's 2001: A Space Odyssey reminded us of the symmetry in Cascade's Double Knit Scarf in black and white. You can find this pattern for free here »

The maze scene in the movie is creepy and features interesting shots. We love the way the maze walls create a twisting pattern, and love the way the two tones of green create an interesting look in this scarf.
Holding two strands together in different colors creates very interesting tonal effects and is as eye-catching as the maze. Try it out!
We hope you were inspired, and would love to see YOUR inspiration groupings. Show us where you draw inspiration from on our Facebook page, our Google+, or tag us in your Instagram photos @nordicmart #nordicmartinspiration


Monday, March 31, 2014

Knitted Felted Nesting Bowls

Image and pattern from Craftfox
We stumbled upon an adorable pattern on Craftfoxes for felted bowls that nest inside each other and decided to give it a try! It's wonderful for beginning felters, and would make a great handmade gift or be a cute addition to your Easter decorations. It's quick and easy, check it out!


We recommend a bulky yarn for this project. Drops Eskimo or Schachenmayr Wash Filz-It are both great choices and felt the easiest.


We picked three different shades of Eskimo for tonal look to these bowls. Each one is a different color.

Supplies:
Size US 9 Double Pointed Needles
         (You can choose the same color or different colors)
A sink or a washing machine for felting


Follow the instructions in the pattern and end by felting either by hand or in your washing machine. It just takes some hot water and some friction to get these yarns to cling to themselves and turn into a felt material. The only little difference we made to this pattern is we did not bind off and pick up stitches, we simply continue to knit the entire way. They ended up looking like mini hats before felting!

Before felting
After Felting, the bowls need to be shaped on a mold while drying
  We promise you have things around your house that you can use as molds. Be creative! We used a candle, an oatmeal container, a vase, and a metal kitchen spoon holder.  You can use bowls for more of a bowl shape than a cylinder or basket shape.

Knitted bowls stacked before felting

Knitted bowls stacked after felting


Happy Crafting and Felting! 


Send us your photos of your finished felted bowls on our 


Thursday, March 27, 2014

How to Make and Measure a Gauge Swatch

Many times you may see patterns or yarn mention a suggested "gauge"
Is this leaving you mystified? What does gauge mean? Why are these numbers important?

This blog post aims to help answer these questions and get you on your way to making your own gauge swatches for your projects. It has a LOT of information, but it's very worth a read and you will learn a LOT!

Gauge in basic terms means the number of stitches per inch across a row horizontally, and how many rows per inch vertically in your knitted fabric. 

Gauge isn't always important. For instance if you are just knitting a straight scarf or something that doesn't need to fit precise dimensions or measurements, it shouldn't matter if your gauge is a little off.
But when you're making pieces that have a size, such as a sweater or a pair of socks, the gauge you knit at is very important for getting the correct size and important to ensuring that the estimates of yarn amounts are accurate.
It may not seem like much, but one or two extra stitches per inch can add up across multiple inches, which can really throw off your sizing and the amount of yarn you need for a project, and you may run out of yarn before you finish your project! Oh  no!

How do you find the suggested gauge? Most yarns have a suggested gauge and needle size listed on their label. You can also always search a particular yarn online or on Ravelry to find info about it's gauge.

For this example, we have chosen Cascade 220 Superwash. Lets look at the label:

By looking at this label I can determine:
The gauge is 20-22 stitches per 4 inches (10 cm) when worked on a US 6 or US 7 needle
Another way to read this would be to say that for each inch we knit on a size 6 or 7 needle, we should have about 5 to 5.5 stitches in that inch. 

Now that we have determined the gauge, we can begin to test if we match this gauge or not with our knitting.

We've made three different gauge swatches using the same yarn on different needle sizes.  This will show you the effect that needle size has on your gauge. When you make a gauge swatch for your projects, you will probably only need to make one or two, to make sure you are matching the suggested gauge. Gauge swatching is also a great way to get a feel for a particular yarn and how it works on your needles. 

How to make a gauge swatch?

To demonstrate the look of a swatch, we made three swatch sizes:
All  made with Cascade 220 Superwash (DK weight)

Swatch 1: Knit on US size 4 needles
Swatch 2: Knit on US size 6 needles (recommended for this yarn on label)
Swatch 3: Knit on US size 9 needles
Step 1: Figure out what gauge is suggested for the yarn or pattern you are using! This should be listed on the label of the yarn or on the pattern.
Step 2: A little (easy) math:
For 220 Superwash, the label calls for a size US 6 or US 7 needle, we chose a US 6.
We know from the label that 4 inches = 20 to 22 stitches. We also want to add a little border to keep it from rolling. If I add two stitches to each edge, we will Cast on 26 stitches. (22 stitches + 4 inches for border = 26 stitches)
We will use the same number of stitches for each swatch, the only factor changing is needle size.
If using a different yarn, simply do this same process using their numbers for gauge suggestion. You may cast on more or less stitches to achieve a 4 inch area in a different yarn weight.

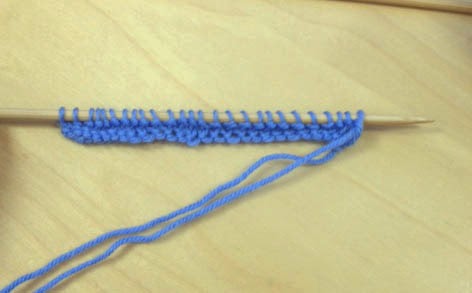
Step 3: (If you haven't already in the previous step) Cast on 26 stitches
Step 4: Knit two rows
Step 5: Now continue as follows, all Right Side rows, knit all stitches across. All Wrong Side Rows, knit first two stitches, purl to last two stitches, and knit the last two stitches. This creates a garter stitch border to prevent curling. (essentially you are alternating a knit row with a purl row, but on purl rows you need to knit the first and last two stitches)

Step 6: Continue like this until your piece measures almost 4 inches from the cast on edge.


Step 7: When you've almost reached 4 inches, Knit across the last two rows and bind off!
Step 8: Block your swatches. Just dunk it in the sink until it is damp, squeeze out the extra water, and lay flat to dry. This is to keep your swatch flat for easier measuring, and is great practice for blocking items later.

Unblocked, note the curling edges
Blocked,  nice and flat
Each differing needle size produces a different number of stitches per inch, and a different feel to the fabric. On smaller needles, your fabric will be denser, tighter, and stiffer (the smallest swatch).
On larger needles, your fabric will be looser, more "drapey" and "floppier" (the biggest swatch).
If you repeat this experiment yourself, you will notice the different feel to each fabric. Sometimes you may choose to use a smaller or larger needle on purpose to create a desired effect in your resulting fabric, such as knitting a tight fabric on the bottoms of socks so they stay warm and cushion your feet more.

Step 9: 
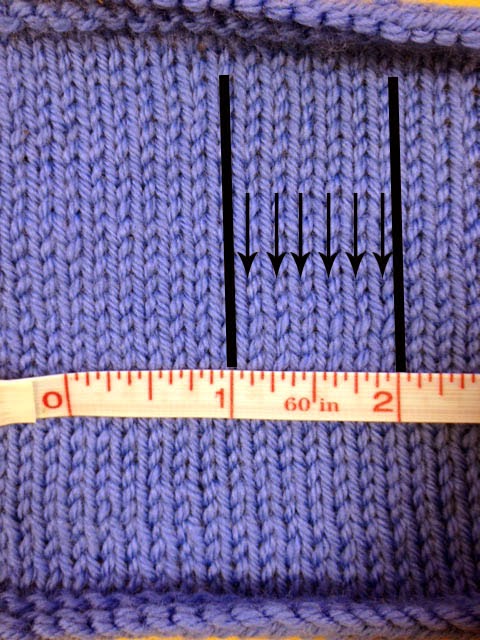
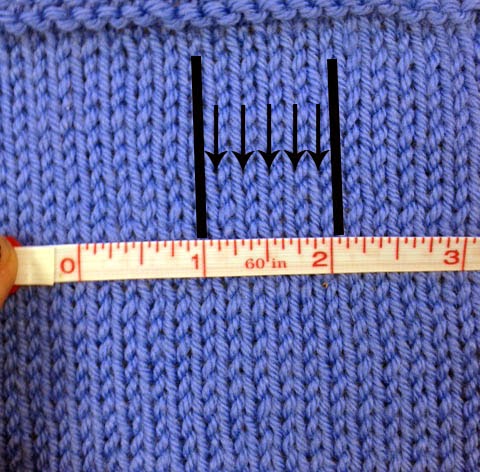
Measure! Line up your tape measure or ruler so you can easily count the number of stitches in one inch. Each stitch will look like a little "v" in your knitting. Count each "v" in one inch section. It is okay to count a half a stitch. Since gauge can vary throughout your own knitting, the best thing to do is to measure a few different sections of your knitting and average them. You may count five stitches per inch in one area, and 5.5 stitches per inch in another area. You're still right on gauge, even though it varies slightly across your knitting, you just want to be sure you don't have TOO much variation! We like nice even stitches :)

Note: We are focusing more on the number of stitches horizontally than rows vertically, because this measurement is a little more important. Usually patterns give precise stitch counts horizontally for casting on (i.e. cast on 26 stitches), but will tell you to continue your rows for a specific measurement (i.e. 4 inches). It is easier to add or subtract rows to achieve a desired length (like how tall you want your socks to be) than it is to add stitches across to make something wider (like how wide the sock opening should be). You should measure your rows so you are aware of how many rows are in one inch, but you don't need to worry about this number too much.

Our measurements turned out as follows:
See images below for pictures of how to count stitches!

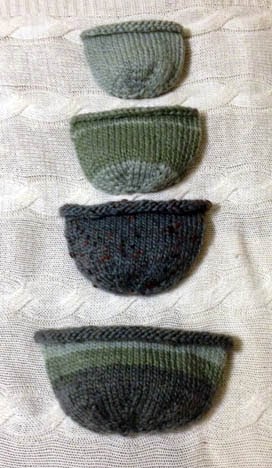
Swatch 1: On US 4 needles, 6 stitches per inch (We have too many stitches per inch, which means we need to go up a needle size to be on correct gauge. If we knit on this needle size in a pattern, it would turn out too small!)
Swatch 2: On US 6 needles, 5.5 stitches per inch (we are also on gauge on this needle size! The fabric is just a little denser and the stitches closer together than on size 9 needles)
Swatch 3: On US 9 needles, 5 stitches per inch (technically we are still on gauge when knitting on this needle size, since we would get 20 stitches per 4 inches.)

Swatch 1: Knit on a US 4 needle. Gauge is 6 stitches per inch x 9 rows per inch
Swatch 2: Knit on a US 6 needle. Gauge is 5.5 stitches per inch x 7.5 rows per inch

Swatch 3: Knit on a US 9 needle. Gauge is 5 stitches per inch x 6 rows per inch

Say you knit your swatch on size 6 needles, but when you measure your stitches per inch you have SIX stitches, when the suggested gauge says you should have 5-5.5 stitches per inch. You have too many stitches per inch. This means you are knitting too tight and you need to go up a needle size or two to achieve less stitches per inch.

As a general rule:
If you end up with too many stitches per inch, you are knitting too tightly and need to go up a needle size or need to loosen your tension (how tightly you hold the yarn)
If you end up with too few stitches per inch, you are knitting too loosely and need to go down a needle size or tighten your tension.

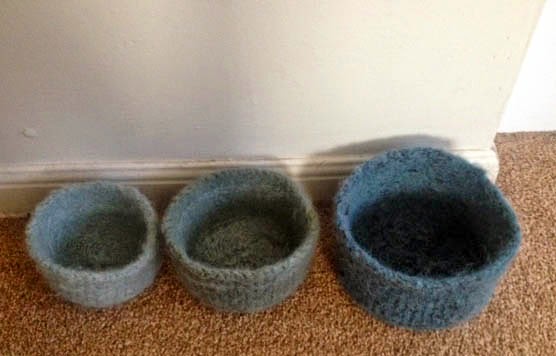
When stacked on top of each other, you can see the different sizes of each swatch. 
Even though we used the SAME number of stitches for each swatch, the different needle sizes produce DIFFERENT sized swatches.

This is the basic lesson of gauge: the number of stitches per inch matters when determining size! 
Once you know this, you can very easily customize projects.

For example: Say you want to knit a straight scarf that is 8 inches wide. You knit a gauge swatch on a size 8 needle and find out that you have about 4 stitches per inch. To get to 8 inches, simply multiply 4 stitches by 8 inches. That gives you 32 stitches, which means you should cast on 32 stitches on a size US 8 needle to create an 8 inch wide scarf. You could calculate rows in the same way (multiply number of rows per inch by the number of inches you want) or simply knit rows until you achieve your desired length.

Voila! You should now be on your way to creating your own gauge swatches and testing out yarns that you may want to use in your projects. By knowing the specifics of gauge, you will ensure that your knitted garments will come out correctly and the way you are expecting and hoping they will be.

Collect all your gauge swatches and when you have enough, sew them together for a funky, colorful throw blanket or pillow!
You can also use your gauge swatches to test how particular yarn will take to washing. Should it only be hand washed? Can it take a run through the washing machine? Use these little babies to test your yarn! That's what they're for.

If you need yarn or needles for some fun new projects, you can find it all in our
Nordic Mart Webstore 

Happy Knitting! 


Monday, March 24, 2014

A Knitter's (or Crocheter's) Right to Choose-A NM Tutorial on How to Substitute Yarn

Here at Nordic Mart we answer lots of questions about yarn. How many yards? How much is it? Is it machine washable? Does it come in a more yellow-orange, instead of a gold-orange? You get the idea. :) One of our most common questions is "How much do I need?" This question happens a lot, sometimes it is a simple answer and sometimes it is a little more involved.  So to take away some of the mystery here's a handy how-to!

Lush by tincanknits

To get started lets choose a pattern. We thought we would go with this cute cardigan called Lush by tincanknits. This pattern calls for a DK weight yarn. Two great options to choose from would be DROPS Karisma Superwash or Cascade 220 Superwash.

DROPS Karisma Superwash- 109 yds / 50g
Cascade 220 Superwash- 220 yds / 100g


So lets say we are going to make a size Medium using DROPS Karisma which calls for 1100 yards of yarn. For this calculation you would take the yardage required (1100) and divide this by the yards per skein (109), the answer be the number of skeins needed. It's that simple! :)
1100 yards ÷ 109 yards = 10.09 skeins

For this number we would not round up. Most patterns count skeins not actual yardage, we would round up a skein if the decimal place was over 3. 10 skeins should be plenty for this project as long as the gauge is correct.

Let's do an example with Cascade 220 Superwash. Here's a pattern for you crocheters from Ravelry! This Chevron Stripes 3 Season Sweater by Esther Chandler is made using Debbie Bliss Rialto DK. What would we do if we wanted to make it in Cascade 220 Superwash instead? 

If we make a size 36 we need 4 skeins of cream, 2 skeins of purple and 2 skeins of Navy. 

Step 1:

Find the yards per gram of Debbie Bliss Rialto
Debbie Bliss Rialto- 115 yds / 50g


Step 2:

Multiply the skeins required by the yardage of Rialto

Cream: 4 x 115 yds. = 460 yds.
Purple: 2 x 115 yds. = 230 yds.
Navy: 2 x 115 yds. = 230 yds.

Step 3:

Find the yards per gram of Cascade 220 Superwash
Cascade 220 Superwash: 220 yds /100 grams

Step 4:

Divide the total amount of yards required by the yardage of Cascade 220

Cream: 460 yards ÷ 220 yards= 2.09 skeins
Purple: 1 skein
Navy: 1 skein
The purple and the navy require 230 yards, but the designer states that she had plenty of leftover yarn. This means that we only need one skein of purple and one skein of navy. We love an even exchange!


 It's not rocket science, but we know that calculations can be a challenge. Now you are ready to choose a color, which is the best part! We hope this tutorial helps more of you branch out and feel free to pick the yarn you want to work in! :)


Friday, March 21, 2014

Spring Inspiration


Happy Friday all! Spring is officially in the air and it is a great time to be inspired. We found some beautiful inspiration from a knit blog sharing photos of some knit and crochet floral creations. These photos are from the Brooklyn Botanic Garden for their "Knit, Purl, Sow" exhibition. We were mesmerized by the intricate and complex work that has gone into creating this large flora and fauna!


We searched out our own floral inspiration on the web and we found some great patterns to share with you! We found patterns from Ravelry which is a great free pattern resource for knitters and crocheters alike!

Ravelry: Flower Power Shawl by Ekin Deniz

Ravelry: Flower Pie Shawl by Megan Ellinger
Both of these beautiful patterns can be knit in DROPS Lace, a lovely 70% Alpaca, 30% Mulberry Silk blend.

If it is still a little cold where you are at, but you want to bring some spring flowers into your life you could knit this blanket or jacket from Garnstudio.

Try this super soft knit blanket with big floral motifs made from DROPS Alpaca and DROPS Vivaldi

This sweater is one of our most popular patterns! It is originally knit in DROPS Nepal, but you can use any worsted weight yarn. Why not try your own unique spring version in Good Earth Solids, it is a great cotton/linen blend perfect for warmer weather!

If you have some spare time this weekend be sure and check out the podcast from The Knitmore Girls and listen for a Nordic Mart shout out! <3


Wednesday, March 19, 2014

Fun Yarn with Free Patterns


You may not have heard but about the Schachenmayr brand yarns, but they're some of our favorites here at Nordic Mart.

Boston, Boston Style, Lova, and Wash Filz-It! are all bulky yarns with great potential for colorful patterns.

Here we'll give you some adorable free patterns to use with these yarns for some inspiration! Why not give them a try?

First, let's meet the yarns:

Boston
Boston is Super Bulky
Wool/Acrylic Blend
Machine Washable
Just $4.95 per 50 grams
Find tons of pattern ideas for this yarn on Ravelry » 
Purchase Boston here »


Boston Style
Boston Style is Super Bulky
Wool/Acrylic/Polyester Blend
Machine Washable
Just $5.39 per 50 grams 
Find tons of pattern ideas for this yarn on Ravelry » 
Purchase Boston Style here »


Lova
Lova is Super Bulky
Wool/Acrylic Blend
Machine Washable
Just $5.95 per 50 grams
Find tons of patterns using this yarn on Ravelry » 
Purchase Lova here »


Wash Filz-It! (Now 25% Off for the month of March)
Wash Filz-It is Super Bulky
100% Virgin Wool
Will Felt easily in your Washing Machine
Starts at only $3.39 per 50 grams
Find tons of patterns using this yarn on Ravelry » 
Purchase Wash Filz It here »


What can I make with these yarns?
We're glad you asked! The possibilities are endless, but here are a few basic free patterns we picked out.


Two great hats for guys, one knit, one crochet, both stylish and easy to care for. 
Knit the hat on the left with this pattern »
Crochet the hat on the right with this pattern »


These two jumpers are cozy, washable, and have fun pops of neon color for just the right amount of funk.
Knit the pattern on the left with this pattern »
Knit the pattern on the right with this pattern »


Two great basic hats, one ribbed in Boston, one convertible in Lova.
The hat on the right can be cinched on the top to be a hat, or loosened and pulled around your neck as a cowl 
Make the hat on the right with this pattern »
Knit the hat on the left with this pattern »


Scarves for guys or girls, Boston makes some eye-catching accessories for everyone. 
Knit the pattern on the left with this pattern »
Crochet the pattern on the right with this pattern »


Make this cute crop jacket in Lova or Boston using this pattern »

Have fun with these yarns and create funky and fashionable garments that will make you stand out! 
Find all these yarns at the best prices at www.nordicmart.com 
Happy Crafting!